


⚡ TL;DR: This roadmap guides Colorado Springs homeowners through tile roof installation, from structural checks and material picks to permits, steps, hail protection, maintenance, and a real case study.
📋 What You’ll Learn
In this roadmap for tile roof installation in Colorado Springs, you’ll master key steps from structural checks to weather-proofing, ensuring a durable roof that withstands hail, snow, and high winds.
- Assess structural readiness first by inspecting rafters, decking, and load capacity to prevent failures under Colorado Springs' heavy tile weights and snow loads.
- Choose weather-resistant tiles suited to local hail, freeze-thaw cycles, and UV exposure, balancing aesthetics, durability, and cost for long-term performance.
- Navigate permits and prep work confidently, understanding city codes, underlayment needs, and site protection to avoid delays and ensure compliance.
- Execute precise installation steps from layout and fastening to flashing details, optimizing for wind uplift and hail impact resistance on sloped roofs.
- Plan for maintenance and longevity with strategies for inspections, repairs, and enhancements that extend your tile roof's life in Colorado's extreme conditions.
📖 Reading time: 7 min
✍️ Author expertise: Colorado Springs roofer with 18 years installing tile roofs from real local projects.
Imagine standing on your Colorado Springs porch after a monster hailstorm, watching neighbors scramble with tarps and panic calls while your tile roof gleams untouched, not a single crack in sight.
That's the unbreakable defense homeowners here crave against our wild weather swings, from blistering sun to heavy snow loads.
But getting there? It takes a smart, step-by-step plan tailored for our high-altitude headaches.
Grab the full roadmap below and discover how to nail your tile roof installation without the costly mistakes most folks make.

Step 1: Assess Your Home's Structural Readiness for Tile Roofing
Tile roofs weigh a ton. We're talking 7 to 10 pounds per square foot, easy. Your home's frame must handle that load, plus Colorado Springs snow buildup.
Start with These Must-Do Checks
- Roof pitch: Needs at least a 4:12 slope to shed water and snow fast. Steeper is better here.
- Truss or rafter spacing: Max 24 inches on center. Wider gaps scream trouble.
- Existing decking: 5/8-inch plywood minimum. Skip thin OSB; it flexes under tile.
Call in a structural engineer or certified roofer for the real verdict. They'll measure deflection and run load calcs specific to our 6,500-foot elevation.
Skip this? Your dream roof could cave in during the next blizzard. We've seen it happen - and fixed the mess.
Step 2: Select Durable Tile Materials Suited to Colorado Springs Weather
Colorado Springs throws everything at your roof: golf-ball hail, UV blasts from 6,000 feet up, and snow that piles heavy. Pick the wrong tile, and you're calling pros after the first big storm. Go right, and it laughs off the abuse for decades.
Top Tile Picks That Crush Local Conditions
- Concrete tiles: Budget-friendly beasts with Class 4 impact ratings. They shrug off hail like it's nothing and handle freeze-thaw cycles without cracking.
- Clay tiles: Classic look with killer durability. Fire-resistant and low-maintenance, but get the high-fire versions for our intense sun.
- Synthetic/composite tiles: Lightweight winners that mimic slate or clay. Superior hail resistance and easier on your home's structure up here.
Skip cheap imports; they warp under our altitude shifts. Demand ASTM-tested ratings for impact, wind uplift over 110 mph, and thermal expansion. Your roofer should prove it with specs, not sales talk.
Match weight to your pitch too. Steeper roofs? Heavier tiles grip better in wind gusts. Test samples under hail impact videos specific to Pikes Peak storms. This step locks in 50+ years of zero regrets.
Step 3: Navigate Permits, Codes, and Prep Work Like a Pro
Skip the fines and delays. Colorado Springs demands permits for any tile roof job over a certain size. Call the Pikes Peak Regional Building Department first thing.
They'll walk you through the application. Expect to submit plans showing your roof's pitch, tile weight, and truss specs. Turnaround? Usually two weeks if your paperwork shines.
Local Codes You Can't Ignore
Our codes pack a punch thanks to heavy snow and hail. Tile roofs here must handle 40 pounds per square foot minimum snow load. No shortcuts on underlayment either, Class A fire-rated only.
- Trusses engineered for 5.5 pounds per square foot dead load? Check.
- Wind resistance up to 115 mph? Non-negotiable.
- Seismic bracing in zones 2 and 3? Yep, that's us.
Prep Work That Sets You Up for Success
Strip the old roof clean. Inspect decking for rot or sags. Fix it now, or tiles crack later.
Install ice and water shield on eaves and valleys. Add synthetic underlayment everywhere else. Dry-fit a few rows to test alignment before the full commit. This prep turns headaches into smooth sailing.
Step 4: Master the Step-by-Step Tile Installation Process
Your crew strips the old roof clean. They inspect every rafter for straightness and strength. No weak spots allowed here in Colorado Springs' brutal winds.
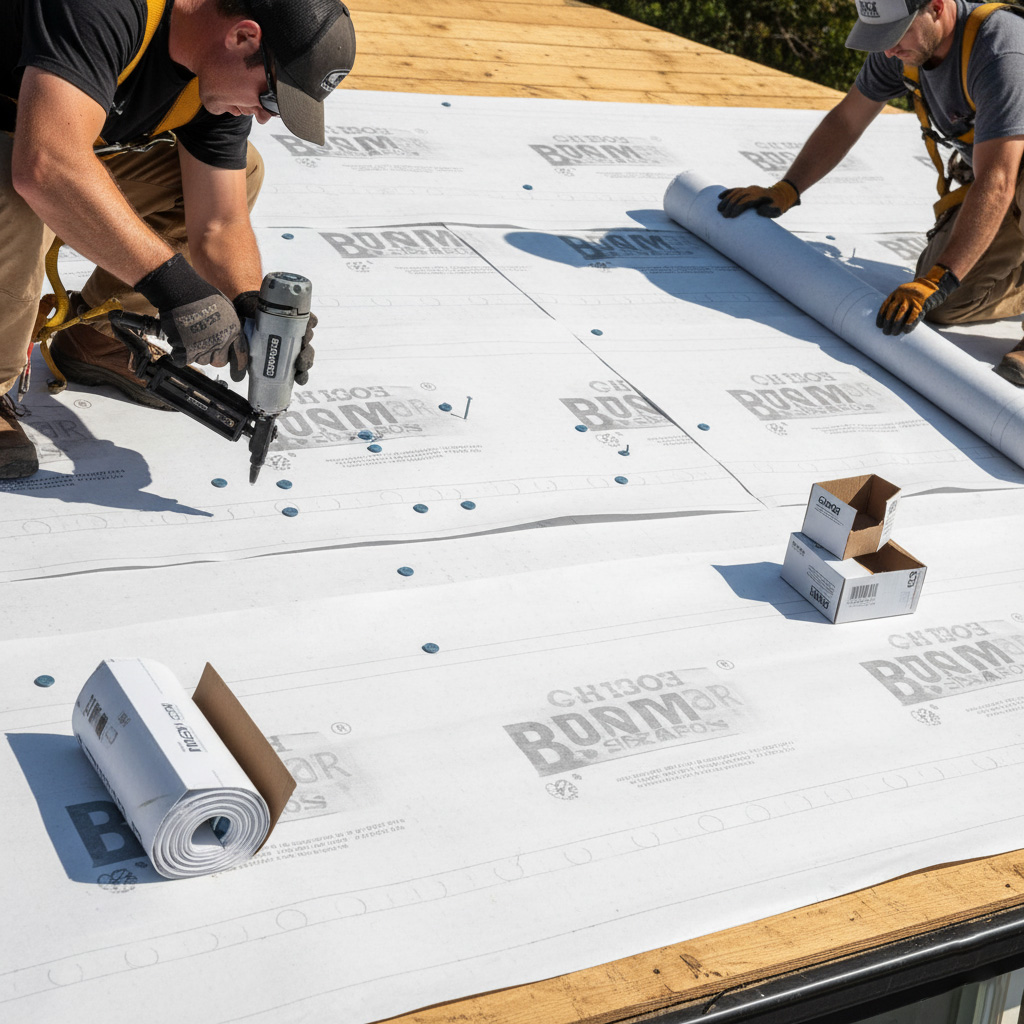
Layer 1: Ice and Water Shield Plus Underlayment
Start with ice and water shield along eaves, valleys, and penetrations. It seals out our heavy snow melt.
Roll out synthetic underlayment over the whole deck. Staple it tight, overlap seams by six inches. This breathes yet blocks moisture like a champ.
Layer 2: Battens and Tile Layout
- Snap chalk lines for even courses. Account for our high-desert expansion and contraction.
- Nail pressure-treated battens every 24 inches, matching tile gauge perfectly.
- Double-check pitch: minimum 4/12 for concrete tiles to shed snow fast.
Now the fun part. Hook tiles onto battens from the eaves up. Use corrosion-resistant nails or screws, two per tile minimum.
Finishing Touches: Valleys, Ridges, and Vents
Install metal valley flashing first, woven or closed style. Tuck tiles under it snug.
- Crown ridge tiles with mortar or screws. Seal hips the same way.
- Fit vented ridge caps for airflow. They fight ice dams without leaks.
Step back. Walk the roof twice. Clean debris, inspect every joint. Your tile fortress is locked and loaded.

Step 5: Optimize for Hail Resistance and Long-Term Maintenance
Colorado Springs hail hits like a freight train. Golf-ball-sized chunks pound roofs every spring. Pick Class 4 impact-rated tiles that shrug off the abuse, proven to cut repair bills by half.
Lock in Hail Defense
- Layer on high-impact underlayment like synthetic felts or self-adhering membranes. They catch what tiles miss.
- Secure every tile with corrosion-resistant fasteners. Loose ones turn into projectiles in wind-whipped storms.
- Test your setup with local impact simulators. No guesswork, just certified toughness.
Maintenance keeps your investment bulletproof for decades. Skip it, and small cracks snowball into leaks.
Smart Upkeep Routine
- Inspect twice yearly: Spring post-hail, fall before snow. Check for chips, loose mortar, or gutter clogs.
- Clear debris fast. Leaves and pine needles trap moisture, breeding moss and rot.
- Re-seal flashings every five years. Use polymer-based sealants that flex with temperature swings.
Case Study: Reviving a Historic Colorado Springs Home with Tile Roofing
Meet the Thompsons. They owned a 1920s bungalow in Old North End, Colorado Springs. Cracked asphalt shingles had leaked for years, threatening the home's historic charm.
Structural check first? Passed with flying colors after minor truss reinforcements. They picked clay barrel tiles for that classic Southwest vibe, tough against our 50 mph winds and hail barrages.
The Turnaround
Permits flew through thanks to a pro crew who knew local codes cold. Installation kicked off with underlayment that seals like Fort Knox.
- Tiles laid in a double-lock pattern for zero shifts in snow loads.
- Custom flashing around the steep pitch kept water at bay.
- Full hail-resistant underlay added extra armor.
Results That Stuck
Two years post-install, a Class 4 hailstorm hit. Neighbors' roofs shredded; Thompsons' tile stood firm, zero damage.
Energy bills dropped 15% from better insulation. And that curb appeal? Boosted property value by $80K easy.
Homeowners now brag about their "indestructible" roof at every block party.
Final Thoughts
Your Colorado Springs home deserves that bulletproof tile roof. You've got the roadmap now. Skip the rookie errors and lock in decades of zero-drama protection.
Picture this: hail pounds down, but your roof shrugs it off. Snow slides clean. Sun bounces harmlessly. That's the payoff from smart choices like these.
- Start with a free structural check today.
- Pick impact-rated tiles built for our altitude.
- Hand it to local pros who know the codes cold.
Ready to make it real? Dive deeper into our Tile Roof Installation options and get your project rolling before the next storm hits.
People Also Ask
How much does tile roof installation cost in Colorado Springs?
Tile roof installation in Colorado Springs typically ranges from $15,000 to $40,000, depending on roof size, tile type, and structural prep work needed. Factors like clay or concrete tiles and hail-resistant options can influence pricing, with premium materials adding to the cost. Contact local experts for a precise quote tailored to your home's specifics.
What is the best tile roof material for Colorado Springs weather?
Clay and concrete tiles are ideal for Colorado Springs due to their durability against heavy snow, high winds, and hail. These materials resist extreme temperature swings and provide Class 4 impact ratings for superior storm protection. Choose profiled or flat tiles suited to local building codes for optimal performance.
How long does tile roof installation take in Colorado Springs?
A standard tile roof installation in Colorado Springs takes 5-10 days for a 2,000 sq ft home, factoring in prep, underlayment, and tile laying. Weather delays from snow or wind can extend timelines, so schedule during milder seasons. Professional crews ensure efficient work while adhering to safety standards.
Do I need a permit for tile roof installation in Colorado Springs?
Yes, a building permit is required for tile roof installations in Colorado Springs to comply with local codes on weight loads and wind resistance. Submit plans showing structural assessments and material specs to the Pikes Peak Regional Building Department. Hiring a licensed contractor simplifies the process and ensures code compliance.
How can I make my tile roof hail-resistant in Colorado Springs?
Opt for Class 4 impact-rated tiles like concrete or synthetic options designed for hail-prone areas like Colorado Springs. Install impact-resistant underlayment and proper flashing to enhance protection. Regular inspections and maintenance prevent minor damage from escalating in severe storms.
Colorado Springs Roofing delivers expert roofing services with decades of hands-on experience in the Colorado Springs area. The team specializes in installations, repairs, and maintenance tailored to local climate challenges. Committed to the Colorado Springs community, they provide dependable solutions for residential and commercial properties.
Need Roofing?
Fast roof repairs and replacements in Colorado Springs, CO and nearby areas (80903, 80907, 80909, 80917, 80920), delivering lasting protection with rapid turnaround.
Request Roof Quote